Seldavino Digital Desktop Timer with a Rounded White Cube Design & High-Contrast Number Display for Work Sessions, Study and Everyday Routines
Seldavino Digital Desktop Timer with a Rounded White Cube Design & High-Contrast Number Display for Work Sessions, Study and Everyday Routines
Couldn't load pickup availability

Seldavino Digital Desktop Timer with a Rounded White Cube Design & High-Contrast Number Display for Work Sessions, Study and Everyday Routines
Give the Task a Beginning. Give Yourself a Place to Stop. ⏳
Some tasks are easy to start and difficult to leave. Others spend the whole day waiting for the right moment. A timer offers a simple way to make a different decision: choose a manageable interval, define what you will do within it and review the result when the session ends.
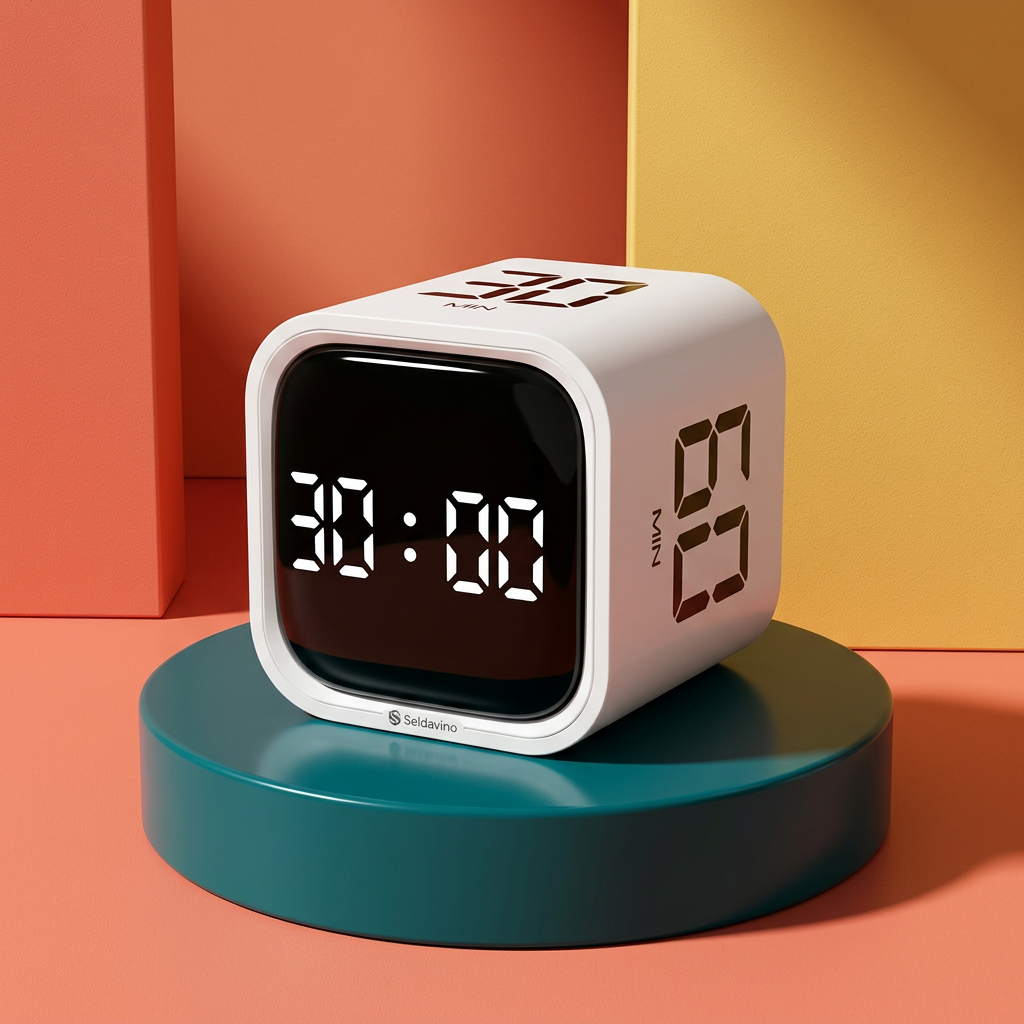
The Seldavino Digital Desktop Timer brings that idea into a distinctive rounded-cube form. A white body surrounds a dark front display with contrasting segmented numerals, while printed minute markings add graphic detail to the visible faces. It is a dedicated timing accessory for a desk, study surface or everyday planning area.
It will not choose the task or do the work for you. Its role is more practical: give a session a visible time reference, separate from the other things happening on your screen.
The Start Line: Choose One Thing Worth Beginning. 🚦
Before setting an interval, decide what the session is for. “Work on the report” can mean almost anything. “Outline the three sections” gives the session a clearer shape. “Study” becomes more useful when it means reviewing one topic or answering a defined group of questions.
Choose a duration supported by the actual timer and appropriate for your task. Leave the bigger project outside the immediate decision. You are not promising to finish everything before the time ends; you are choosing a useful piece of work to begin.
Keep the starting point simple enough that preparation does not become another way to postpone it. Put the materials within reach, remove the distractions you can control and follow the supplied instructions to begin timing.
The Object on the Desk: A Small Study in Contrast. 🧊
White around the outside
The casing has a cube-like shape with generously rounded edges rather than a sharp box silhouette. Its light finish sits naturally beside notebooks, pale keyboards and wood surfaces, or offers a clear contrast against a dark desk mat.
Dark across the front
The front is a rounded-square dark panel bordered by a light-colored rim. White segmented numerals form the main visual feature, making the number display the focus of the face. Visibility will still depend on viewing angle, room light and distance; no particular visibility range is inferred from the image.
Minute markings on the visible faces
The reference shows 30 MIN on the upper face and 60 MIN on the side, with a 30:00 example on the display. These visible markings give the object its graphic character. They do not, by themselves, establish the complete preset selection, maximum timing range or how a marked interval is activated.
Check the actual operating instructions before assuming that turning, tapping or placing the cube on a different face starts a session.
The Working Middle: Let the Interval Support the Task. 🎧
Once a session begins, use the time reference as a boundary rather than a reason to check every passing second. You can glance at the display when useful, then return to the work you chose.
If another idea appears, make a short note for later instead of automatically changing tasks. If the work becomes blocked, identify the missing information. The purpose of a timed session is not to ignore reality; it is to make a more deliberate choice about where your attention goes.
These are optional work habits, not built-in software functions. The timer is not presented as automatically tracking tasks, blocking notifications, recording productivity or connecting to an app.
Three Sessions That Do Not Need to Last All Day. 🧩
The writing session. Choose a draft, outline or revision step. Place the timer where you can check it without moving papers or reaching over the keyboard. When the interval ends, review what is usable before deciding whether to continue.
The study session. Pick one topic and decide what you want to understand or recall. Prepare the relevant material before starting, and use the end of the session as a moment to check what still needs attention. A timer does not guarantee retention or a particular learning result.
The everyday reset. Give a small organizing task a defined window: sort one stack of papers, clear one section of the desk or prepare tomorrow's essentials. Choose an interval that suits the task instead of turning the whole room into an open-ended project.
The Pause: An Interval Can Make Room for Rest, Too. 🍵
A time boundary is not only for doing more. It can also support a decision to step away from a task and return later. If you use the timer for a break, follow the same principle: choose a supported interval, check the setup and let the break have its own place in the routine.
Stand up if appropriate, look away from the screen or attend to something outside the current task. Do not use a timed routine as a reason to ignore discomfort, fatigue or your own needs. The right rhythm is personal and can change from one day to the next.
No particular focus method or automatic work-and-break sequence is claimed. You choose the routine; the device provides its supported timing function.
A Session From Start to Finish. 🎼
You have a page of notes that needs to become a clear summary. Rather than leaving the task open for the rest of the afternoon, you decide what the next session should produce: a rough structure and the points that belong beneath each heading.
You check the timer, start it using the intended controls and begin. A separate question appears, so you note it without leaving the draft. When the interval ends according to the unit's actual behavior, you review what changed.
The summary is not necessarily finished. But the next step is easier to see. You can choose another session, take a break or move to a different priority without pretending the original task has no boundary.
The Finish Line Is a Question, Not a Verdict. 🏳️
When time is up, ask what the session accomplished. Did you finish the chosen step? Discover that it was too broad? Find something that needs another person's input? Each answer tells you more than simply leaving the task running in the background of the day.
A useful finish might be a completed draft, a smaller next action or a decision to stop. The timer is a prompt to review, not a score for how well you used every minute. Keep the routine practical enough that you want to return to it.
Before the First Session, Check the Basics. 🧰
- Read the model instructions. Confirm how to select an interval, start, stop and reset before relying on the timer.
- Prepare the correct power source. Follow the supplied requirements rather than assuming a battery type or rechargeable design.
- Try a test session. Check the displayed information and how the unit indicates completion in your actual room.
- Choose a clear position. Use a firm, dry, level surface where the display is visible and the timer will not be knocked.
- Confirm the setting each time. Read the active display rather than relying only on the printed face marking.
- Keep important timing separate. Do not use an unverified consumer desk timer for safety-critical or medical timing.
Useful Details to Confirm Before You Choose. 🔍
Visible appearance: a rounded white cube, a dark front number display, a light rim and minute markings on the shown faces.
Timing functions: check the complete supported intervals and whether the unit offers countdown, count-up, pause or other modes. The reference does not confirm that full feature list.
Completion alerts: sound, volume adjustment, vibration and silent operation require confirmation. A photograph cannot establish whether the end of a session will be audible in a particular setting.
Controls and sensors: flip activation, touch controls, automatic orientation sensing and memory functions are not assumed from the cube shape.
Power and size: confirm the actual dimensions, power requirements and any included batteries or cable. No battery capacity, charging time or runtime is inferred.
Simple Care for the Place It Keeps. 🧺
Keep the timer away from spills, excessive heat and dusty areas. Use a soft, dry cloth on the exterior and display, following the supplied care guidance. Avoid abrasive cleaners, soaking or opening the casing beyond any user-accessible compartment described in the instructions.
Move it carefully rather than tossing or dropping it. Rounded corners describe its appearance, not an impact-resistance rating. If operation becomes unreliable, follow the manufacturer's troubleshooting guidance before using it again.
One Timer. Your Own Way to Begin Again. 🌱
This listing is for one Seldavino digital desktop timer in the white appearance shown. Computers, books, notebooks, trays and other scene accessories are not included. The displayed time in generated images is an illustration, not a measured demonstration of accuracy.
Choose the timer for its dedicated desktop format and contrasting digital face, then confirm the functions match the sessions you want to plan. Set a clear purpose, use a supported interval and decide what comes next when that interval ends.
Not the whole day at once. Just the next meaningful stretch of it.